
HOW TO: Use onX Off-road Software
This user’s guide to onX Off-Road was written for new off-roaders in our Jeep club, but Desert Wranglers is happy to share this with other 4x4 clubs. Therefore, it does not cover using the program for snowmobiles, ATV’s, dirtbikes, or hiking. This guide is only for our fellow Jeepers who want to be able to navigate an established trail. The software itself has a lot more capability, but this is merely a basic “getting started” guide..You can also download the pdf here.
Introduction

The GPS signal that informs your phone where you are is a different signal than your cellular service. In the old days, one needed to purchase a dedicated satellite device in order to utilize the GPS signals – but these days, any recent model phone will do that.
You only need a dedicated satellite device (along with a monthly subscription) such as the Garmin In-Reach if you want to be able to TRANSMIT text messages via satellite. They sell for a few hundred dollars, plus a monthly user’s fee of around $15. Good for staying in touch with family, friends, or emergency responders if you are out in the middle of nowhere!
onX does NOT allow you to transmit communications up to a satellite, but it does work with your phone’s capability to RECEIVE the GPS location signals so that you can navigate in the middle of nowhere.
If all you need is the ability to see where you are and to follow a planned track or route – then onX Off-Road software, added to your phone, will cover your needs.

Purchase and Installation
Go to https://www.onXmaps.com/ on your computer and click on the Off-Road tab. Go to the Pricing box, and follow the prompts.
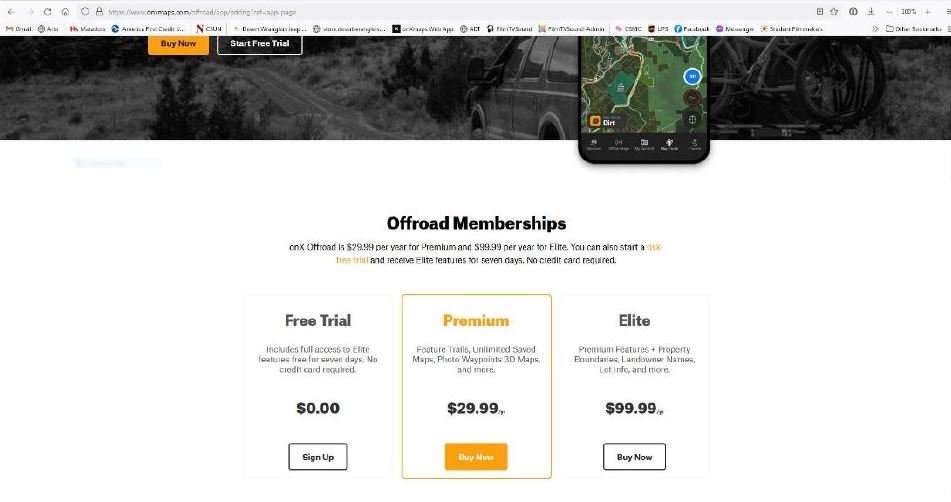
Note that if you are a member of Desert Wranglers, we have a special link and discount code to use instead, which will get you the club discount of 20%, or a free two month trial of the Elite version. The link and code can be found on our website and in our newsletter.
For the majority of us, the Premium version is sufficient. You will probably be just using the pre-stored trails, or downloading additional trails (aka .gpx files) from reliable sources.
The Elite shows you more detailed ownership boundaries including public and private properties – so it is more useful if you are plotting a path from scratch. Elite costs a lot more, so it may not be worth the extra expense unless you do Overlanding or exploring.
FYI, onX Off-road Premium costs approximately $30 per year; and the Elite version is around $100. These are list prices, and do not include discounts. You can often find special offers at various times during the year.
When you get started with onX, you will be asked to create an account. This account name not only allows you to use the Web app (large screen map), but to store your data, and to sync it with the version on your phone. Your individual mapping data is stored in the cloud, so that you can access it from any device with internet or cellular access.
Download the phone app to your mobile device. When you sign-in with your account, your mobile will sync to your web version and share data. (No, your home computer does not need to be turned on.)


onX maps Web app on your computer
onX works on your computer as well as on your cell phone. Although you can do accomplish everything on your phone, I find it a lot easier to do pre-planning on a large screen and with a fast internet connection. Almost everything that you do in your computer will sync to your phone, with the exception of auto downloading your off-line maps (which I will explain later on).
https://www.onXmaps.com/ When you log in with your account, it will switch to a user interface very similar to what appears on your phone.
The large screen makes it very easy to distinguish by background color if an area is BLM, forestry, or private.
When you open the program the first time… Use the My Account/Settings (lower left corner) to select: crosshairs ON; decimal coordinates; show scale bar.

You can easily view, scroll, zoom on your computer screen.
Map style icon in the lower left corner of screen > choose from satellite view, topo, or hybrid mix of topo & satellite. Choose 2D or 3D.
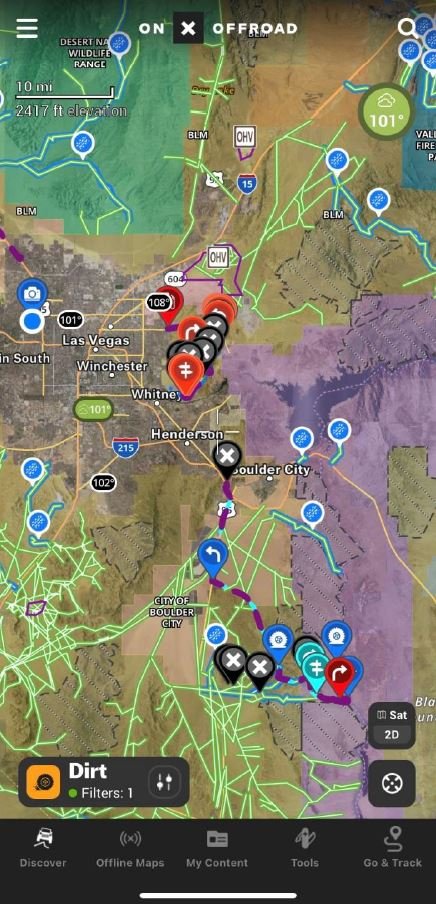
Use SEARCH (upper left corner) or scroll map manually to locate a destination.
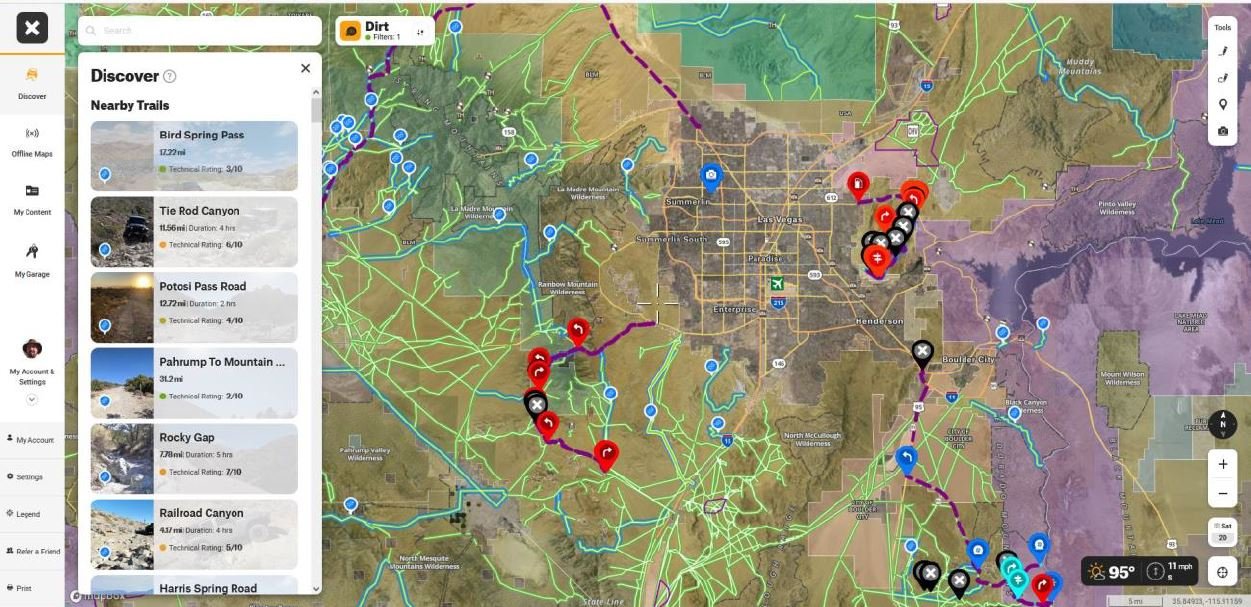

Position the crosshairs, and you can use the DISCOVER tab to bring up a list of nearby trails, along with detailed descriptions. Featured trails (pre-run by onX staff) are in blue; other trails are in green. Refer to the Map Legends explanation located inside the My Account/Settings tab to understand the color codes and such.
Identifying an existing trail that you see on the map. Just center the crosshairs over the trail, and click the mouse. The trail description will pop up on the screen.
If you press the MORE option on the description, it will present a button to save off-line. That save off-line shortcut will allow you to quickly make an off-line map centered on the crosshairs location. This will make sense after you read more about off-line maps later in this article.
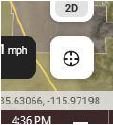
The steering wheel icon in the lower right corner will re-center the map to your current location.

My Garage: enter your vehicle description and check off boxes for: 4x4 High Clearance (jeeps), and Full Width roads. This will narrow the Discover search for suitable trails (ignoring ATV, dirtbikes). These settings seem to have a temporary effect on filtering out stuff – so I recommend just setting the choices in the Filters box, which is a more global setting.
Filters: located next to Search, upper left of screen. Select DIRT (not snowmobile), and select the 4x4 and Full Width options only. Filters setting will keep your screen less cluttered from trails that are not relevant to Jeeps.
Check the weather conditions anywhere in the country…. Just center the crosshairs and click on the temperature icon in the lower right corner. Detailed weather forecast will pop up.
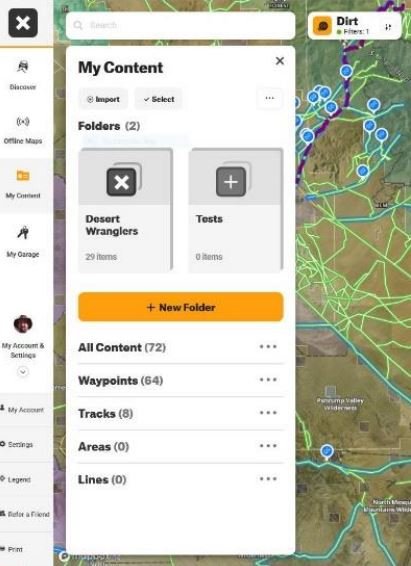
My Content tab shows a list of tracks and waypoints that YOU have saved. This includes tracks that you have imported from outside sources as .gpx files. It also includes tracks that you have recorded & saved on a trail run. It is also possible to trace a line along any existing (pre-stored) track that you see on the screen, and then to rename it and save it to My Content.

Note that the data in My Content will sync to your phone. But any off-line maps whose names now appear in your phone must be downloaded directly to your phone -- by clicking on them in your phone.
Working with tracks
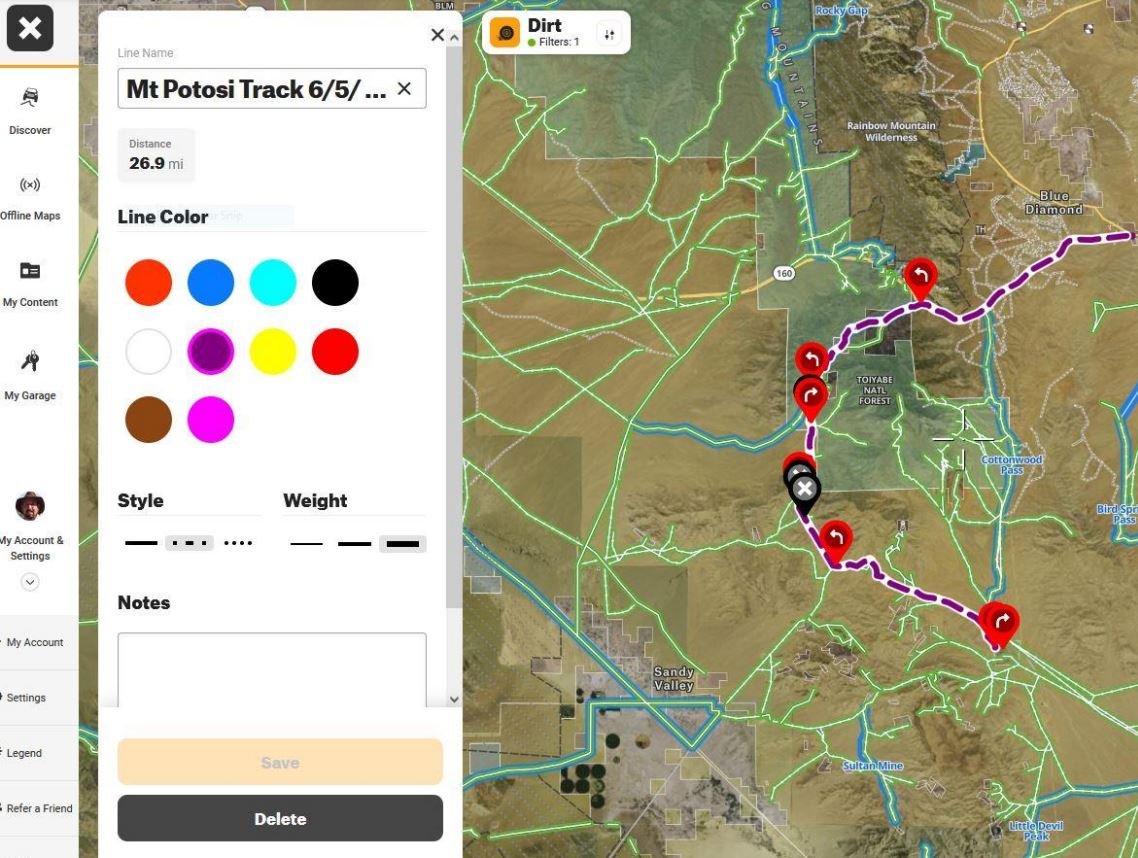
To draw a track or route, just click on the drawing pen on the right side of the screen. As soon as you click on the pen, an edit window will appear. After you draw your track/route, you can name that track and edit its color and appearance. The new track will sync to your phone as well.

Currently, you have to either drag along the entire track with the pen, or click points along it to make straight lines connecting the dots. I prefer to zoom in to the trail, and trace – so that my line stays within the path. onX has announced that a future update will let you automatically trace a winding path. Area Pen There is a tool to drop points to measure distances and to fence in an area. That tool is more for ATV or snowboarding, and would rarely be used for club jeeping.

Waypoints and Photo Waypoints These tools will drop a marker on the crosshairs, so the easiest way is to scroll the desired spot under the crosshairs. But if you choose to move the marker, just drag it to where you want it. After dropping the waypoint, you can edit it with a useful name, color, and choose from dozens of meaningful icons to mark turns, air down/up, bathroom, and so many more.
Editing your tracks
You have probably noticed that your screen can get cluttered with lots of blue and green trails. If you click on a trail in My Content to bring up its description – there is an EDIT button. Editing allows you to do a lot of things, including renaming the track, choosing a different appearance, trimming it, sharing it, and more. The first thing that I like to do with my favorite tracks is to change their name and appearance: a new color (not green or blue); with a thicker line/dashes/dots. That makes them easier to spot on the map.
For example, I use purple to mark my tracks. I find purple is easy to see on a wide area (planning) map – but does not show up well on my phone screen when actually navigating in the car. So I swap out the color scheme to something more vibrant so it contrasts brightly against terrain background before hitting a trail – since clutter (from surrounding tracks on the map) is no longer an issue when you are zoomed in and just following one path on a run.
If you want to edit the name or appearance of an onX pre-stored track, then just trace it, save the new line into My Content, and now you can customize it.
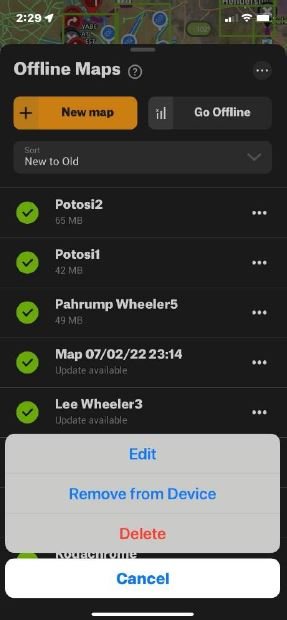
Offline Maps
The whole point of using onX is to be able to navigate by GPS and to view a detailed map of where you are, and the track you are driving on.

When there is cell service, your phone will automatically download the map imagery, overlaid by your trail. But when cell service drops out – there will not be any map information visible.
However, you will still see your position and the track line on your phone screen, and can navigate with it. You just won’t see any visual map. However, onX allows you to download the area maps ahead of time, while you still have phone service. Then, when the cell signal is no longer available – the system will use the pre-stored maps to provide seamless visuals of your track along with complete imagery. As you drive along, the stored map will automatically scroll, so the system is seamless.
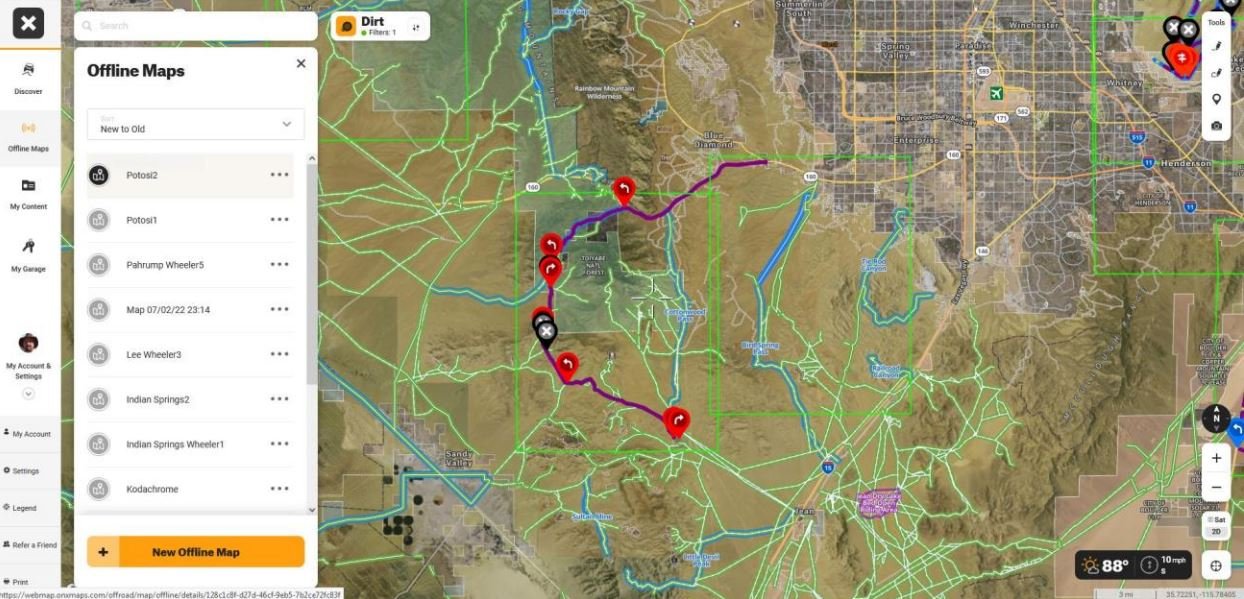
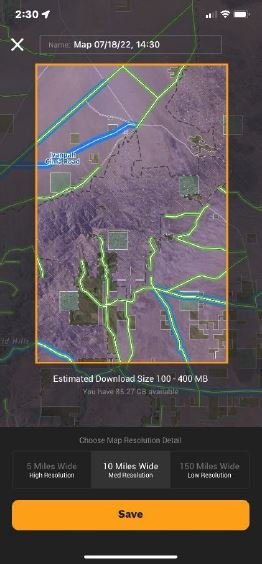
To create and save an off-line area map for your phone – here is what you do. On your computer (or on your phone), go to Off-Line Maps.
Click to add “ + New Offline Map”. A rectangle will appear on your map display. Choose the detail resolution for your map (10 miles is the popular setting). 150 miles will show very little terrain info; and 5 miles is only needed for extreme zoom-in detail. Different settings use up increasing amounts of storage space, so make sure you do not exceed the size of your available phone storage. Scroll the map around to cover as much of your route as possible. Many routes or tracks may exceed the 10 mile rectangle, but that is not a problem. Save the first rectangle and name it something that makes sense to you, and give it a number (such as 1). Now hit the add new map button again, and make an adjoining rectangle with only the slightest overlap of one side, in order to cover the remaining area of your trails. Name it, number it, save it. Add as many rectangles as you need.
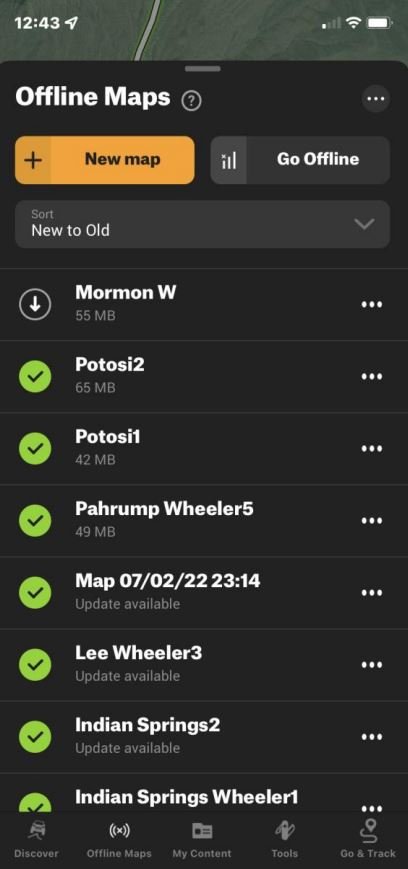
All of these newly created maps will appear in your Offline Maps section. Their NAMES will sync and appear on your phone… but not the maps themselves! You need to press on each of these new maps in order to instruct your phone to DOWNLOAD them. (example: Mormon W) It only takes a few moments per map, so it is not a painful process; but it is a REQUIRED PROCESS. I prefer doing this at home, before I head out to a run. But you could do this anywhere that you still have cell service.
Giving all of the maps for one trip a number as well as a collective name makes it easier for you to know which maps you need. For example: CowPatty_1, CowPatty_2, CowPatty_3.
If your phone storage gets too full, you can delete previously used maps from your phone Maps content. The names will remain, and the original maps will still be on your computer version – just remember to download them again when you need them in the future.
Maps that have been downloaded to your phone with have a green checkmark next to them. Maps requiring to be downloaded will be labeled to remind you. If you press the three dots on the right of each map name, you will see the options to EDIT the map, remove from phone, or delete it completely.
Importing a Trail into your system
Note that trails & routes that you acquire outside of the onX program (downloaded or shared tracks) are stored initially in your computer files or in other GPS programs as .gpx files. When you import a .gpx file, you are adding a third party track to your map.
Personally, I prefer to use my regular computer for managing my .gpx files. There are lots of files online to select from; or someone can email you the file as an attachment. For example, our Trail Leaders usually send me their track route a few days before the run, and I store and sort them in folders.
You could import .gpx files directly to onX in your phone, if you feel comfortable working with files. .gpx files can be shared from other phones, similar to sharing a photo.
Go to My Content. Press IMPORT. Then browse for a .gpx file that you are storing somewhere on your system. You can easily SHARE one of your tracks with someone else, just by clicking on the track in My Content and pressing the share button, same as if you were sharing a photo. You can also share only a waypoint from your content the same way, which will appear on their map.

The files on your computer version of onX will sync to your cell phone, so the .gpx will now show up in both My Contents. Your computer version and your phone version use the same account log-in.
If you look inside TRACKS – you will see the new .gpx by its descriptive name. It will not say .gpx even though that is the filename.
Click on that track, and it will open with full descriptive information. Use EDIT to rename the track. Use initials to keep track names concise. For instance, for me, DW indicates a Desert Wranglers Club track. FG means a personal track that I recorded.
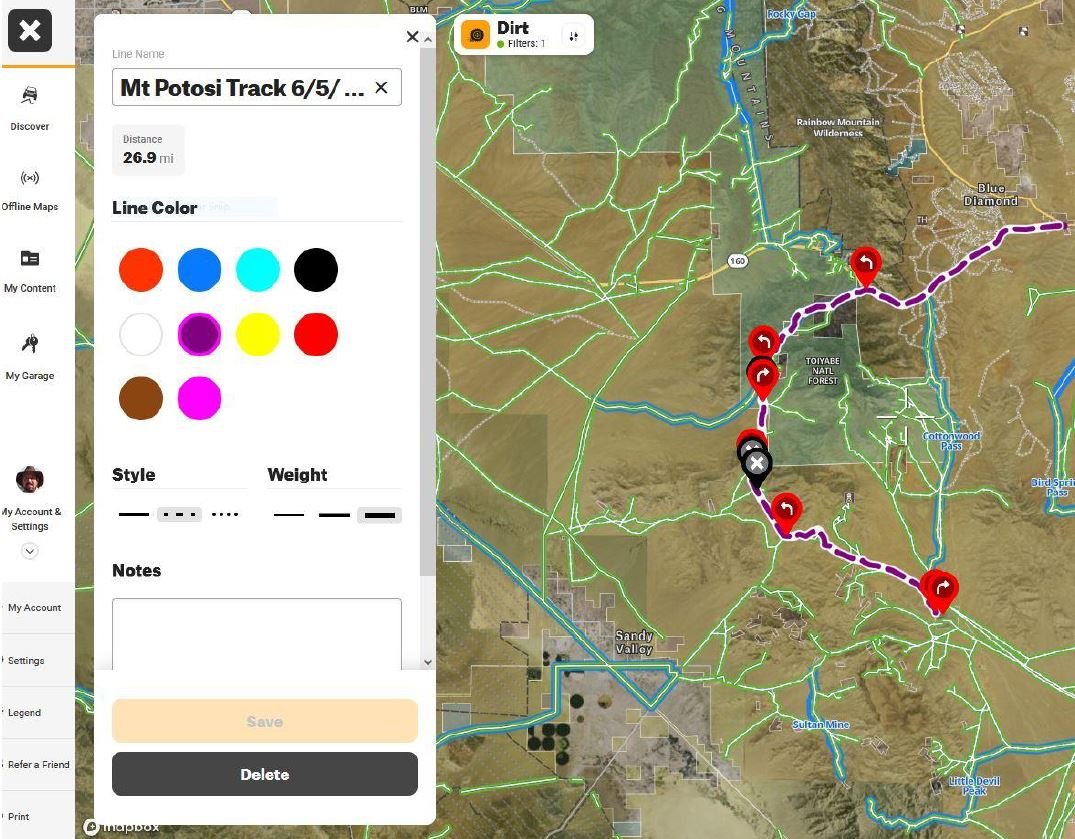
Change the color to something that will stand out. For example, I save my favorite tracks as purple, so they are not confused with the blue & green OnX tracks. You can also make the track lines thicker (recommended) or choose from dashes, dots, etc. Then press SAVE.
You can TRIM a track, to adjust a starting or ending point. Just drag to lengthen or shorten a recorded trail.
When the track is open on the map, you can add or remove WAYPOINTS by centering the crosshairs where you want to drop a marker; or by dragging a marker to a location. You can assign colors and descriptive icons, along with meaningful names, and even detailed notes, photos.


Waypoints work the same way on your phone as they do on the computer.
onX Phone app
For the most part, the phone app works the same way as the web version on your computer. The only key difference, other than the location of the control buttons and swipe up/down to view the detail pop-ups, is that you have to download the off-line maps before you lose your cell connection.
onX does support CarPlay for Android and iPhone, so you can see your navigation track on your dashboard screen (if your Jeep is equipped). However, you cannot control the app from your dashboard screen, so you will still need to mount your phone where it is convenient to view & operate.
Located in the MENU (three stripes at the upper left).
MAP LEGENDS: blue=featured trails; green outline (white fill) = full width roads; green dashed line (white fill) = Jeeps & high clearance vehicles. Orange thick lines = closed trails.
Scroll down to see other map legends, such as BLM, Forest Service, Private Land.
Settings: Coordinates: set to decimal. Enable all of these: show crosshairs, pinch, map tilt, screen always on, show offline map outlines.
Marking your location if you need rescue

Tools > Mark Location It will create and drop a waypoint where you are. If you click on that waypoint with your finger, it will show your location, time, and decimal GPS coordinates.
The steering wheel icon in the lower left corner will re-center the map to your location.
Discover trails nearby; Check weather forecast for anywhere

Use SEARCH function (upper right corner) to type in a place; or use the re-center your position on map icon (looks like a steering wheel in lower right corner). The go to DISCOVER tab to view featured and non-featured trails nearby. Featured trails (appear blue on the map) have been run by onX staff, and include detailed descriptions. Other trails show in green, with less information.
Check the weather forecast by centering your destination on the crosshairs of the map, and then pressing the weather icon in the upper right corner.

To identify an unknown trail that you see on the map…. Center the crosshairs onto the trail, and then press the crosshairs with your finger. The trail name and description will pop up.
My Content
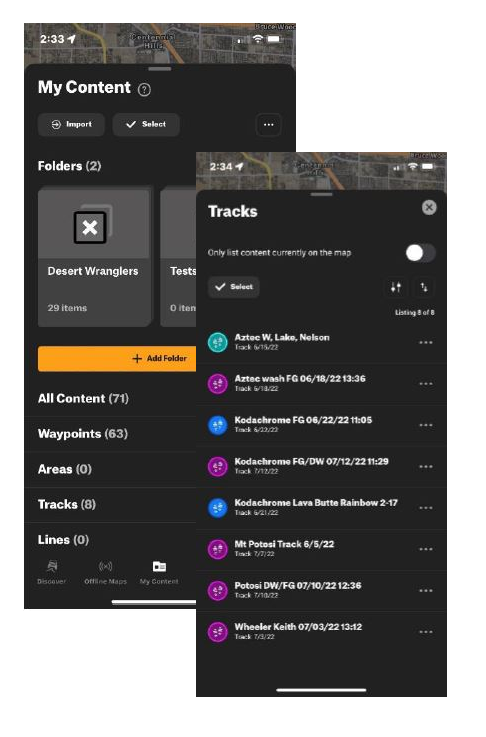
The data that you have stored in My Content on the computer will sync and appear on your phone (and vice versa).
You can create folders to organize your content of tracks and waypoints.
If you select a track, either from a folder or from the main list – a pop-up description will appear and the map will re-center on it. In the description, there are a row of command options near the bottom of the screen.
EDIT works the same as on the computer. You can re-name, change color and line appearance, add notes.
SHARE allows you similar to sharing a photo.
TRIM allows you to shorten/lengthen either end of the track.

If you select a WAYPOINT, a description will appear. In the description, there are a row of command options near the bottom of the screen.
EDIT works the same as on the computer. You can re-name, change color, choose a different icon.
SHARE allows you similar to sharing a photo.
Go to Waypoint is a feature that you when you scroll to the left in order to reveal more buttons. It will re-center the map to that waypoint.
NAVIGATE TO will send the coordinates of that waypoint to the street navigation systems that you have on your phone, such as Apple Maps, Google Maps, Waze. The phone will open in that app and provide street driving directions to the waypoint. Remember that you do not need a track in order to drop a waypoint onto the onX map – so you can add waypoints to mark any location that you desire.
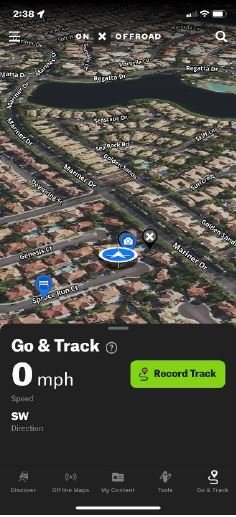
Go & Track
This is the heart of the onX system. You will use this when you are ready to begin your actual driving.
SCREENMAP ORIENTATION
The phone app works best in the portrait (vertical) mode. Although the map shows up when the phone is held in landscape (horizontal) – you lose all the control icons.
When driving, you can have the map either face North, or rotate so that your vehicle always points upright (the preferred mode for most people). Tapping on the steering wheel icon (lower right corner) will re-center the map around your location; repeated tap will turn the center icon into a “flashlight” and scroll the map orientation as needed so that your visible route is upright. When you are plugged into CarPlay, sometimes it takes a bit of tapping and delay before both of your screens adjust orientation.
Once you have arrived at your meeting site or at the beginning of the trail – engage the GO & TRACK tab at the bottom right of your screen.
Press to RECORD TRACK. This will begin recording the actual path that your vehicle is taking, regardless of whether you are on the navigation line or cutting across a field. It also records elapsed time (which you can pause during stops). Essentially, you are creating a breadcrumb trail behind you – which you can follow to find your way back to any point, in case you get lost exploring or missing a turn.
Most likely, this new recorded track will overlap the existing trail (track) that your caravan has been following. Sometimes, though, a trail leader may take a detour – so this newly recorded track provides a new track that you can repeat for a future run.
Pressing the double arrow button changes the view from 3D to 2D.

You can scroll (close) the GO & TRACK pop-up at any time, without turning off the recording function. To re-open it, just press the tab.
To PAUSE a recording, just press the button. The screen will give you a choice to RESUME or to END RECORDING.
If you choose to END recording (such as at the air-up or ending trailhead) – a screen will appear so that you can RESUME recording again, or SAVE the recording in MY CONTENT as a new track. Or you can delete the recording completely if there is nothing significantly new about it worth saving.
During the SAVE process, you can re-name the recorded track. Or, just wait until later – open it from My Content and EDIT it. From the date/time info, you should have no problem identifying the new track.
Tools
The TOOLS tab is similar to what is on the computer version. You can draw or trace a line, mark an area boundary, add a waypoint, add a photo waypoint, and mark your location. Marking your location can be critical for summoning help; but you can also use it just to drop a marker at an interesting spot for future reference.
Off-line Maps
The Off-line Maps tab is similar to the tab found in the computer version, but there are some key differences.
When you create an off-line map on your computer, the system saves the name of the new rectangle map to your phone – but it does not download the terrain details!
You can create new off-line maps directly on your phone, similar to the way you do it on the computer. Just choose a resolution (10 miles is the norm), scroll the screen to position the rectangle, and save. The map will download at that time.
Maps that have been downloaded to your phone with have a green checkmark next to them. Maps requiring to be downloaded will be labeled to remind you.
If you press the three dots on the right of each map name, you will see the options to EDIT the map, remove from phone, or delete it completely.
Always remember to open your Off-line maps tab and make sure that all of your off-line maps, from the computer or from the phone, have been fully downloaded.
Sometimes there is updated information or imagery for an existing map on your phone. You will see a prompt next to the map name indicating that you can update it, simply with a press of your finger. It is always wise to keep your maps updated.
If your phone storage gets too full, you can delete previously used maps from your phone Maps content. The names will remain, and the original maps will still be on your computer version – just remember to download them again when you need them in the future.
When you press Go Offline, your phone will no longer attempt to receive its map imagery from cellular signal.
Under normal operations, your phone does receive constantly updating map imagery through cellular service; that is how Apple maps and Google function. But when you are out of cell range – your navigation screen appears blank. The same thing occurs when you use onX. The satellite imagery will no longer be visible – although onX will still show you the track line and your vehicle location.
When onX loses its cellular connection, it will automatically switch over to off-line mode. If you have stored some previously downloaded “off-line maps” – the system will seamlessly switch to that imagery. You probably won’t even see or know that the system has changed over. Everything will function the same, and the visible maps on your screen will continue to scroll along with your vehicle.
As you drive from the boundaries of one map into an adjoining map, the system will scroll along without your needing to do anything. If you completely drive out of your pre-stored map boundaries – then you will still see your track but the rest of the screen appears blank. Your recorded track will still be visible; you won’t be lost!
Sometimes the cellular signal merely kicks in and out a lot, as opposed to cutting out completely. This can become irritating. This is when you should manually instruct onX to Go Offline. Your phone will no longer attempt to receive broadcast map imagery. Note that your phone will ALWAYS continue to receive the GPS signals, which come from satellites and not from cellular towers.

When you manually go offline, it only affects the onX app. It does not put your phone into Airplane Mode. Your other phone functions will remain switched on, such as for phone calls, texts, and messaging. True, if you are without cell service, those functions will not work – but whenever cell reception resumes – your phone will function normally.
When onX is in the off-line mode, the top of your phone screen will appear RED as an indicator. This red screen border will appear whether your system is off-line due to lack of cell signal, or due to manual choice.
If you are manually off-line, you can resume online functionality by pressing the button in Off-line Maps.
Check out this video from onX - A Complete Masterclass on how to use the onX off-road software
onX Offroad In-App & WebMap Demonstrations with Hunter & Jake | onX Offroad - Masterclass
by: onX
Desert Wranglers does have an affiliation/sponsorship with onx. This video is for instructional purposes only.Written by Fred Ginsburg Copyright © 2022 by Fred Ginsburg. All rights reserved. onX and screenshots are the Registered Trademark of onXmaps.